Flaking paint, dark staining or a sticking sash can justify investigation, but none of them shows how far timber decay has progressed. A weathered surface may cover serviceable joinery, while a neat finish can conceal an open joint, a failed earlier repair or deterioration on a face that cannot be seen with the window in place.
This guide is about diagnosis: what a homeowner can notice, what a sash-window specialist checks, what may remain uncertain until controlled opening-up, and how the findings affect the scope of work. The broader decision between repairing and replacing a window is covered separately.
Quick answer: does hidden rot mean the sash window needs replacing?
No. Hidden rot does not automatically mean that the whole sash window needs replacing. The decision depends on the exact location and extent of decay, the condition of the surrounding timber and joints, whether the box frame remains sound, and whether the source of moisture can be corrected.
A non-invasive survey can often identify likely moisture routes, failed coatings, open joints, movement problems and areas that need closer attention. It cannot always show the back of a sash, the inside of a joint, the underside of a rail or the concealed parts of a box frame. Those limitations should be stated before work is agreed.
| REPAIR A SASH INSPECTION NOTE The visible surface is evidence, not a complete diagnosis. A useful inspection separates what can be confirmed now from what may only become clear after a sash is opened, removed or locally exposed. |
What homeowners can see — and what those signs do not prove
The same visible sign can have more than one cause. Sticking may come from paint build-up, swelling, distortion or a cord and balance problem; dark timber may be old staining rather than active decay. The table below shows why the next diagnostic step matters.
| Visible sign | What the specialist checks | What the check may establish |
| Failed paint or putty | Edges, glazing rebate, joints and likely water route. | Coating failure and where moisture may be entering; not the depth of decay on its own. |
| Dark staining | Whether the area is dry or recurring, and whether adjacent details admit water. | A moisture-related pattern or historic staining; colour alone does not confirm rot. |
| Local softness or material loss | The boundary between affected and sound timber, using selected testing where appropriate. | Whether deterioration appears superficial, localised or more extensive. |
| Open sash corner joint | End grain, joint movement, lower rail and adjoining stile. | Whether the joint can be stabilised or needs a local timber repair. |
| Sticking or swelling | Paint build-up, alignment, distortion, sash movement and moisture exposure. | A mechanical or moisture-related cause; sticking alone is not proof of decay. |
| Old filler or repair line | Integrity of the repair and whether the original moisture route was corrected. | A sound earlier intervention or a defect that needs opening-up. |
| REPAIR A SASH FIELD NOTE A tidy painted face can be misleading when a joint has opened behind it or an old filler repair has failed at the edge. Equally, distressed paint does not mean that the whole member has lost structural value. |
Where hidden decay is commonly found
Decay is often concentrated where water reaches end grain, remains at a joint or is repeatedly drawn behind a failed coating. Lower sections deserve particular attention, but they are not the only possible location. Leaking masonry, failed perimeter details, glazing defects and internal condensation can produce a different pattern.
Lower sash, sill and corner joints
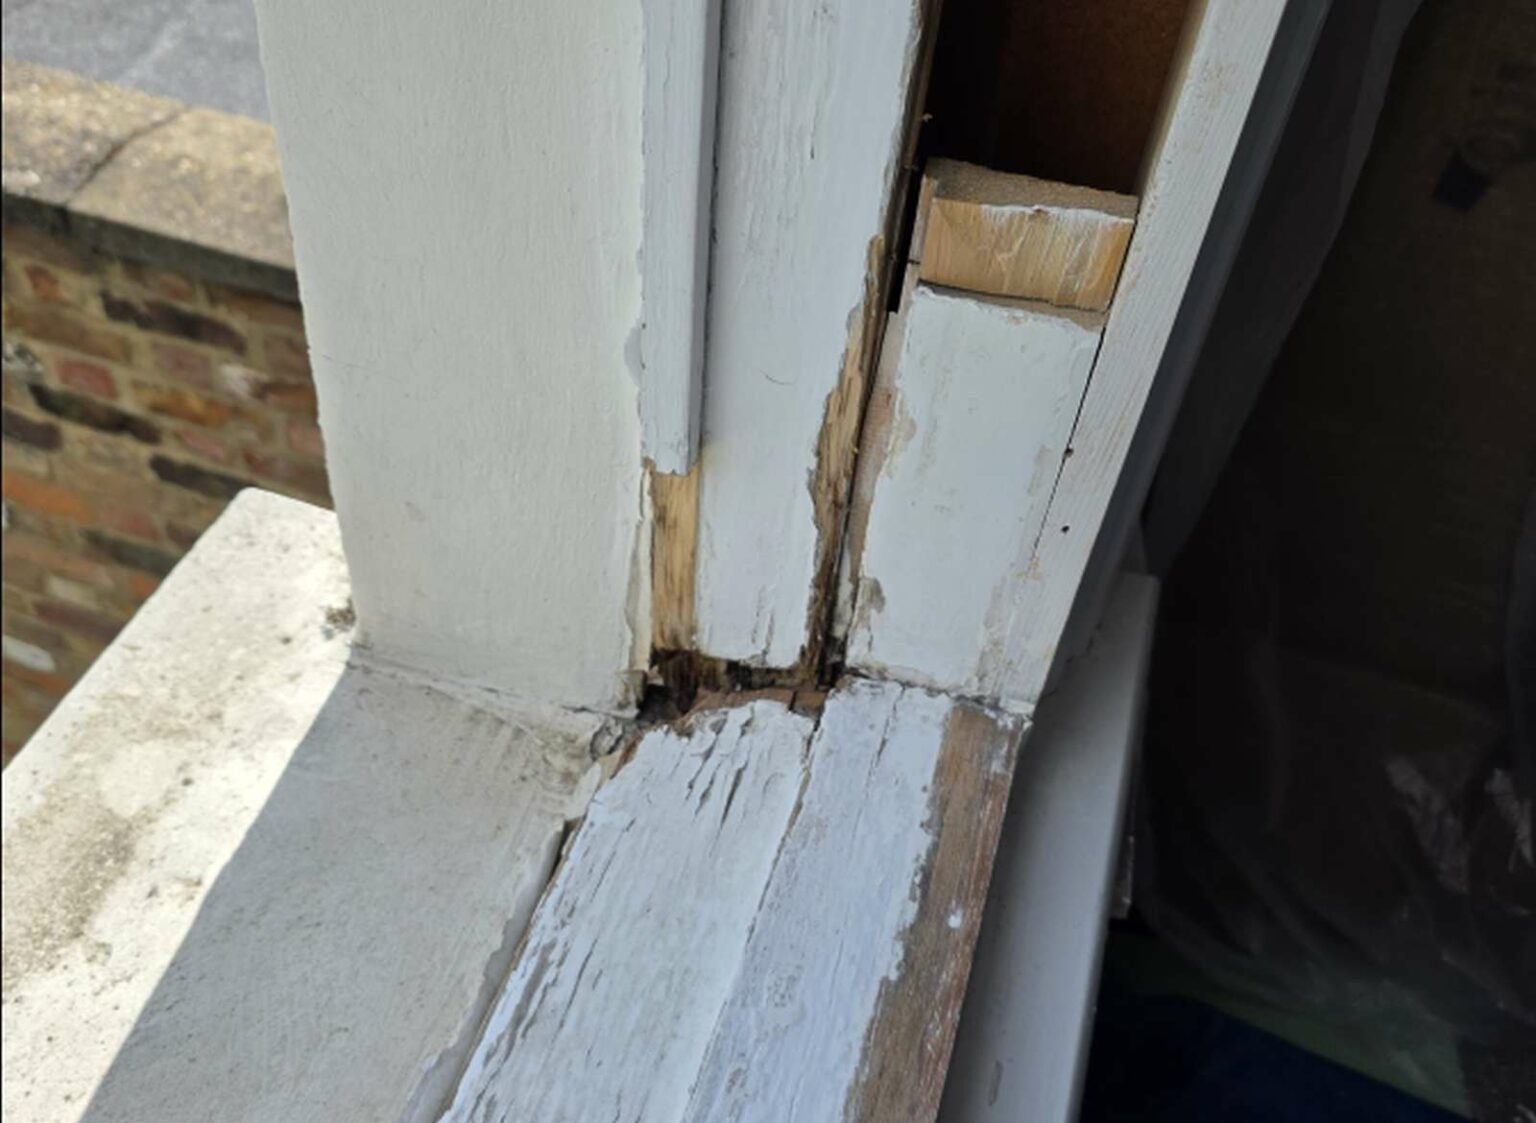
The sill, bottom rail, lower ends of the sash stiles and their corner joints commonly receive run-off and splashback. A small opening at the joint can admit water into end grain before the full extent is visible on the painted face. The useful question is not simply whether rot is present, but how far it extends into the rail, stile or joint and how much sound material remains.
Glazing rebates, box frame and adjoining masonry
Failed putty or a gap at the glass edge can allow water into the glazing rebate. Other concealed areas include the back or underside of a sash, the outer lining and lower sections of the sash box, and the junction between the frame and masonry. Damp masonry or a defect above the opening can keep re-wetting timber even when the most obvious paint failure has been treated.
What a specialist checks during a sash-window survey
A sound survey is more than a search for soft timber. It needs to connect the visible symptoms with the construction of the window, its movement and the likely route by which moisture reached the affected area.
External condition and the likely moisture route
The inspection should cover the paint and putty, sill and joints, glazing edges, perimeter junctions and any detail that prevents water from shedding cleanly. The surrounding wall also matters: staining or dampness may originate above or beside the frame rather than in the window itself.
Movement, alignment and component behaviour
Opening and closing the sashes can reveal swelling, distortion, rubbing, failed cords or balance problems. These observations help separate a mechanical defect from timber deterioration and show whether a local change has affected the geometry of the window.
Sash condition versus box-frame condition
The moving sashes and the fixed box frame should be assessed separately. A damaged bottom rail does not show that the box has failed, and a sound-looking sash does not rule out deterioration in a concealed box section. Mapping the condition by component keeps the eventual repair scope proportionate.
Selected diagnostic testing
During the first Repair A Sash survey, the window remains assembled. The inspection is visual, with careful local probing used at suspicious points when appropriate; the sash is not removed at this stage.
A probing result is considered together with the location, surrounding joints, coating and likely moisture route rather than as a stand-alone pass-or-fail test. If concealed faces need confirmation, sash removal or limited opening-up takes place later as part of the agreed work. The SPAB technical note on repairing wood windows likewise treats investigation and removal of the moisture source as part of a repair assessment.
What may only become clear after opening-up
Some uncertainty is unavoidable while a window remains assembled and painted. The concealed face of a rail, the underside of a sash, the interior of a corner joint, the back of a glazing rebate and parts of the sash box may not be fully accessible during an initial visit. An old filler repair may also extend farther than its visible edge suggests.
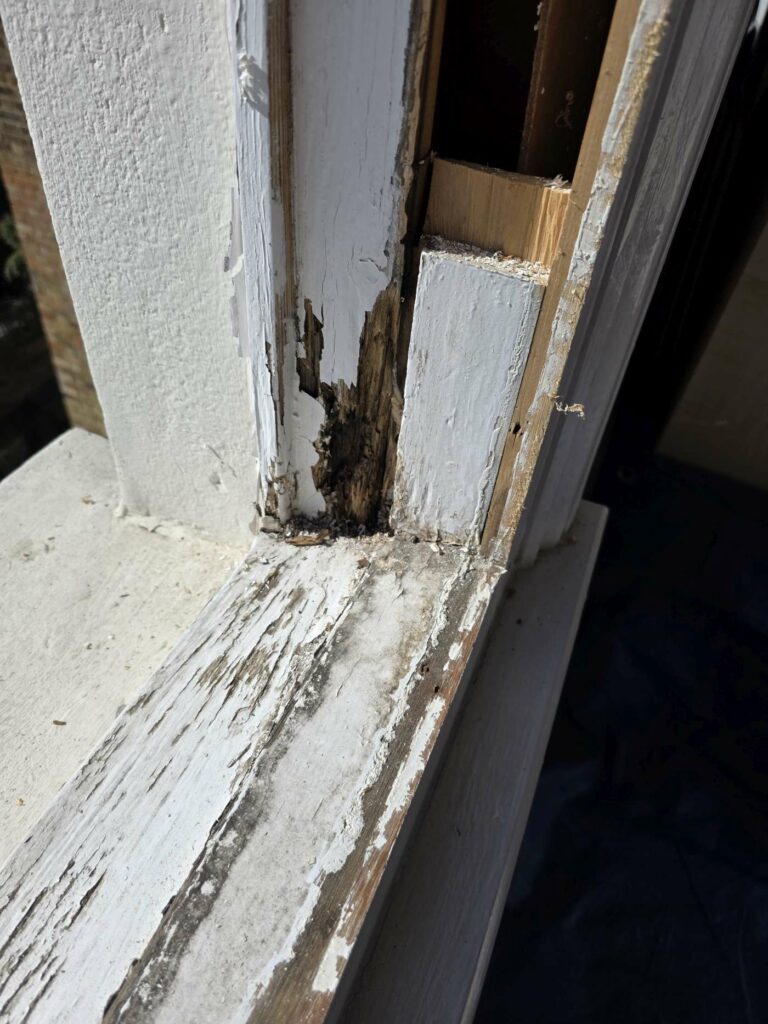
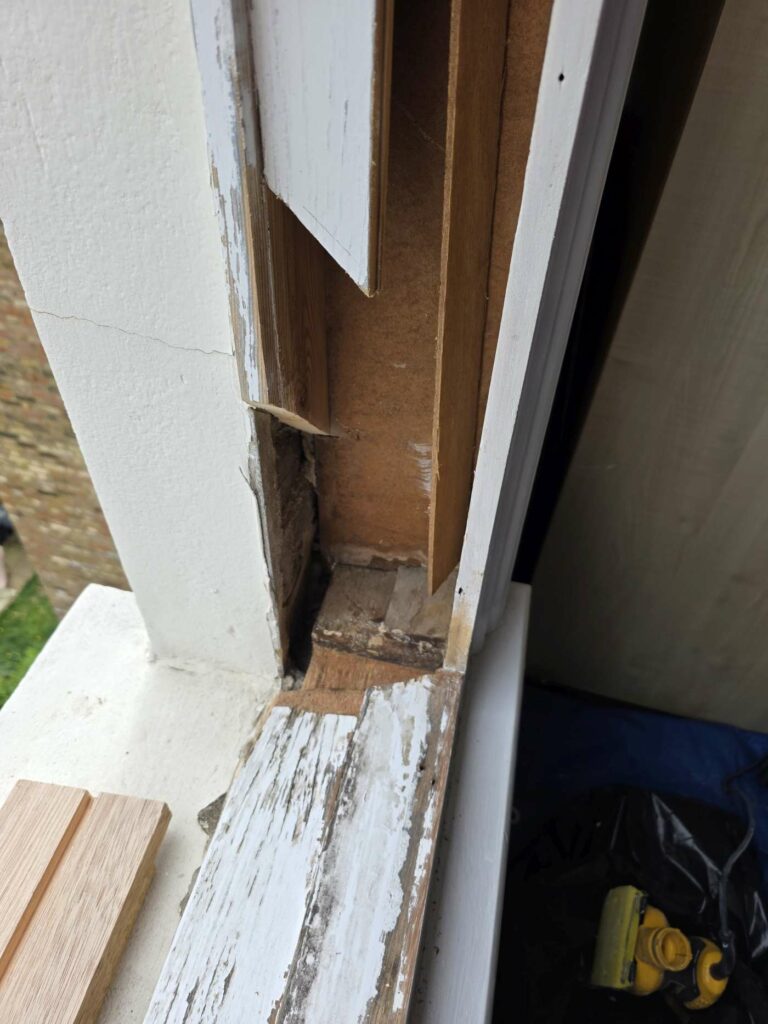
Controlled opening-up may involve removing a sash, taking out failed material or locally exposing a joint after the work has started. That can change the measured quantity of repair, but it should not change the basis on which the homeowner was advised. A clear quotation should distinguish confirmed defects from provisional areas and explain how additional findings will be documented and agreed.
Our guide to how access and preparation affect the repair programme explains the wider sequence and likely timescales.
| REPAIR A SASH INSPECTION NOTE A responsible survey does not pretend that every hidden face is visible. Its value lies in identifying the most likely risks, defining the limits of access and setting out how later findings will be handled. |
Why finding the moisture source matters
A timber repair is unlikely to remain effective if the same area continues to get wet. The source may be failed paint or putty, an open joint, a glazing or perimeter detail, water held at the sill, damp adjoining masonry, a leak above the opening or persistent internal condensation. More than one route can be present.
Paint and filler may conceal a defect but are not automatically the cause. The practical sequence is to find and correct the moisture route, remove unsound material and rebuild the affected section. Draught proofing can improve movement and air leakage; it does not repair decay and should follow structural work.
For the wider maintenance context — coatings, putty, exposure and the warning signs that justify early action — see our guide to how long timber sash windows can last.
When localised decay can be repaired
Local repair may be appropriate when the affected area can be taken back to sound material, the remaining rail, stile, sill or frame section can still perform its structural role, and the source of moisture can be addressed. This approach retains serviceable original joinery instead of treating one defect as evidence that the entire window has failed.
The exact repair depends on the member and the load carried through it. Repair A Sash’s sash window repair service covers localised timber repairs as part of a broader assessment of the sash and frame. Independent guidance from Historic England also favours careful assessment and repair of traditional windows before unnecessary complete replacement.
Timber splice versus resin repair
Repair A Sash generally uses an epoxy resin system for smaller defects. Where decay is more extensive, the rotten section is removed and replaced with a timber splice or patch. Some repairs combine the two methods.
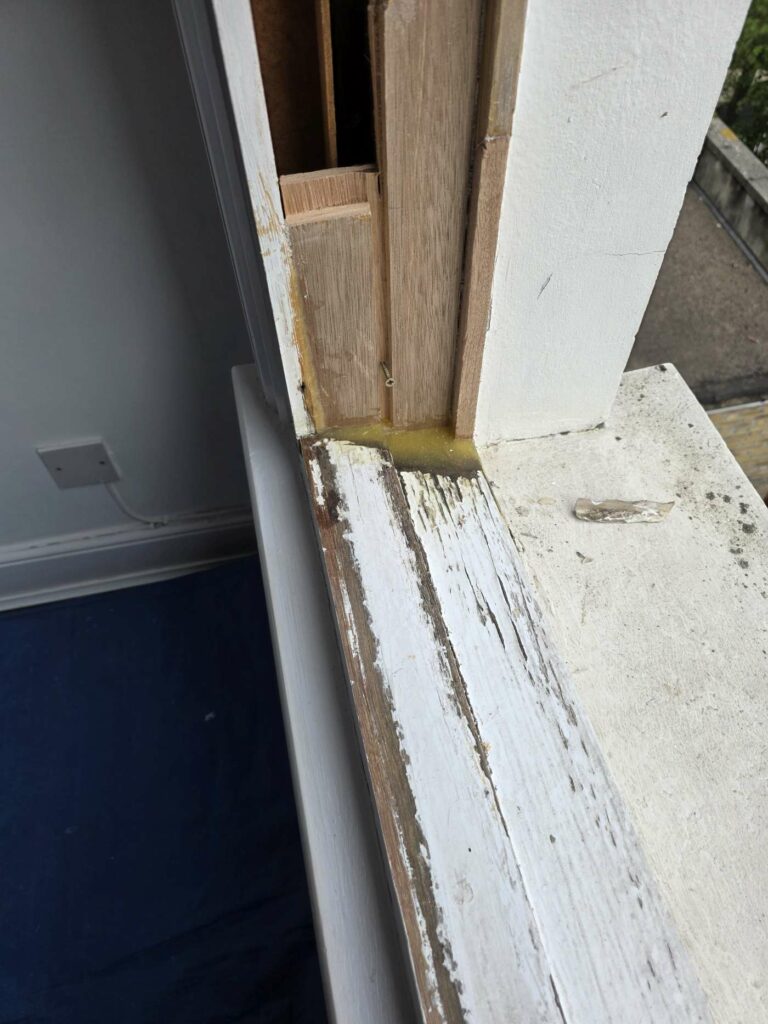
The final choice depends on the component, the shape and depth of the defect, and how much sound timber remains. Resin should not be used simply to bridge a large void or conceal a substrate that cannot support a durable repair.
How the findings affect the next step
If decay is confined to a joint, lower rail, sill or short frame section and the surrounding timber is sound, a local repair may be enough. If the sashes have several defects but the box frame remains serviceable, new sashes fitted into renovated existing boxes may be considered. Widespread deterioration across both sashes and frame requires a broader assessment.
This article deliberately stops at the inspection findings. The separate repair-or-replace guide explains how condition, retained material, technical performance and project scope are weighed once the defects are known. Where the box frame is sound but the existing sashes are not a sensible repair prospect, see new double-glazed sashes in renovated existing boxes.
Planning and heritage status should be checked before a change to material, profile, glazing or appearance is agreed. Repairing like for like may be treated differently from alteration or replacement, and listed buildings can require specific consent.
Use the London conservation-area guide and the listed-window restoration guide for the wider checks. For borough-specific context, see our guide to replacement-window rules in Kensington & Chelsea.
What homeowners can do before the survey
- Note exactly where the change appears and whether it follows rain, cold weather or internal condensation.
- Take one photograph of the whole opening and a closer photograph of the affected joint, rail, sill or paint edge.
- Record any earlier repair, repainting, glazing work or leak that may help explain the moisture route.
- Do not force a swollen sash, press hard into painted timber or strip old coatings simply to test for rot.
- Share any known listed-building, conservation-area, lease or management-company restrictions before a material change is discussed.
- Ask which findings are confirmed at survey stage and which parts of the quotation remain subject to controlled opening-up.
FAQ about hidden rot in sash windows
No. Localised decay can often be repaired when surrounding timber remains sound and the moisture source can be corrected. Assess the sashes and box frame separately.
An external view can reveal failed paint, joints and likely moisture routes, but not every concealed face. Some findings remain provisional until controlled opening-up.
Common locations include the sill, bottom rail, lower joints, glazing rebates and lower or outer box sections. Masonry, leaks and condensation can create other patterns.
No. Colour may show earlier wetting or historic staining. Moisture, material condition and surrounding details are needed to judge whether decay is present.
Often, yes. A defined area may be cut back to sound timber and repaired with an appropriate splice or specialist system. Suitability depends on the member and joint.
Not always. Visual and operational checks reveal much, but concealed sash faces, joints and parts of the box may only become accessible after removal or opening-up.
No. Repair A Sash generally uses epoxy resin for smaller defects and replaces more extensive rotten sections with a timber splice or patch. Some repairs combine both methods, depending on the component, defect and amount of sound timber that remains.
Reviewed by and sources
Reviewed by: Borislav Čakarević, Repair A Sash
Last updated: 13 august 2026.
Independent references: